"Pebbles End" (Page last updated 24 Apr 2017)

Entry - 2007 Gnatterbox card base challenge and subsequent updating.
Outline description of the project
If you have read the the South Coast Steam (A layout concept) page you will recall that I was working on an alternative project to this one for an on-line competition but time ran out to complete that design before the deadline. However a brainwave struck,.and with regard to getting an entry into that 2007 modelling challenge, I was able to build this all card static diorama, completing it in a day to meet the competition deadline. It was placed in storage after the event and reactivated in Spring 2009 hence the additional updates below.
This page outlines the project. . To see the latest progress update click here.
Back to page top | To the start of the build log | To the latest update
Fictitious background / back story.
Location site for this imaginary railway is Ferrybridge, Weymouth & Portland. Dorset. Although I have not modelled the actual buildings you can see the wooden huts that inspired the model in this photograph. If you look at the aerial images on Multimap and follow the hard landscaped promenade westwards from the end of Ferryman's Way they are at the far end of the triangle formed by the foreshore and the caravan park . (Section revised Apr 2017 - replacement map link)

The modelled scene is looking south with the Fleet and Chesil Beach on the back scene. However a minimum gauge layout in this location is only stretching reality a short way to create my fictitious railway. Whitehead's Torpedo Works on the other side of Portland Road to the east did have a short 18" gauge and later 2ft gauge system. So for my fictional back history all I have done is extend that system over the road and assumed that, as later developments took place, it changed ownership and evolved. So phase 1 - transporting test gear to/ from Whitehead's torpedo works and The Fleet in connection with underwater weaponry testing. Phase 2 (current\) during the 1970s the area was redeveloped and a new road bridge built. The Whitehead's use had dwindled to virtually nothing so the link over the main road was closed. However the line was not closed but bought by local narrow gauge railway enthusiasts who lifted the existing track and adapted it so that it reached the new fish landing facility on the south side of the Fleet adjacent to Smallmouth. It was used as a running line for the group's preserved stock and also for transporting shell fish and other landed fish stocks. Phase 3 is the current work in progress and will see the line open with tourist passenger services supplementing the shell fish operation.
Back to page top | To the start of the build log | To the latest update
Concept review since original build date -
When I built Pebbles End as a static diorama in the winter of 2007 I had no intention of making the layout operational. However since that date I have been inspired by Steve Bennett's simple concept layout "Simplicity Sidings" and his earlier "Vanguard Works". Consequently a retro engineering phase was considered with the card track to be replaced by operational 9mm gauge electrified track work and some form of scenic break at the non-shed (eastern) end. However on further evaluation I have since realised the original concept of showing what can be done with a simple low cost card diorama is a sound one and the layout will remain non-operational. I also want to have another go at the printy draft option with a revised version incorporating the lessons of hindsight learnt with this build: therefore a new micro layout will be developed.
Back to page top | To the start of the build log | To the latest update
Start of the build diary and subsequent updates in chronological order.
(1) - 16 December 2007
Back to page top | To the latest update

As stated above I decided to see if I could build Pebbles End, a shoe box diorama in a day . The reality is that in 10 hours I did manage to make an acceptable attempt although as later updates show there were some design flaws. It is 100% card other than the obvious rolling stock, the gauge is 9mm and scale O9. As I had no 7mm NG rolling stock the Fairymeade Mill Cane loco kit was one of Jim Fainges card kits (Link updated Apr 2107) downloadable from the internet and, although not visible in the photo, was re-gauged to 9mm . The locomotive is too large for an 18" gauge footprint, looks top heavy for the system and is no longer used. All scenic aspects are my own work except for two Mayang Textures used in the ground cover elements of the base design. If you also read the outline to what was the initial 2007 Card Challenge project (See South Coast Steam (A layout concept) you will note I started work on a design for a shed printy. This was trialled in this project.
.
The original set of five pictures show the diorama as it was at challenge deadline date of 16 December 2007. It was completed to the stage shown there in twelve hours total time, roughly 10 hours build time, as there were a few breaks. Materials used are 240gsm card, photo-mounting board, some corrugated card from the craft shop, watercolour paint, PVA glue and art spray mount for the back scene and base sheet. The little tippers are Jouef 009 and will run on the card rails track OK if pushed but the point/turnout is static! The model was acceptably complete on deadline day but with outstanding items required to finish it including, notably, adding the last bit of back scene over the shed roof. To see the latest progress update click here.
The main lesson learnt at the end of the build phase for this competition was that the "printy" concept has problems in the larger scales if the colour print is onto white card as the edges show up when using a 3D layering as done here A mark two version will be designed to print onto coloured card so that the edges are not white. Additional photographs of the diorama can be found here or the individual images can be loaded by clicking on the thumbnails.


Back to page top | To the start of the build log | To the latest update
Progress update - (2) - 16 March 09:
I pulled the layout out of storage to do some work on it and discovered that some warping has taken place in the mounting board card base due to damp storage conditions over the recent winter. Not irrecoverable and, as my interest has been reawakened in this project, some progress is likely over the summer; warm days listening to the gulls are just made for time to be put aside for modelling a seaside layout; find a shady part of the garden add a portable chair & table to work on and .....! Apart from anything else I have now ordered a loco kit (Mite) from Steve Bennett to run on it so it does need some proper track.
Back to page top |To the start of the build log | To the latest update
Progress update - (3) - 14th May 2009 (NB The external links in this section last checked and updated/replaced where necessary Apr 2017)

Work resumed on this diorama build this week bringing it to the level I had intended to reach back in 2007 plus rectification of the problems arising since then. The items dealt with to date include, finishing the back-scene, adding an internal support to the back left hand corner of the shed roof, straightening the back-scene back board and stiffening up the base. Additional photographs of the diorama can be found here or the individual images can be loaded by clicking on the thumbnails.


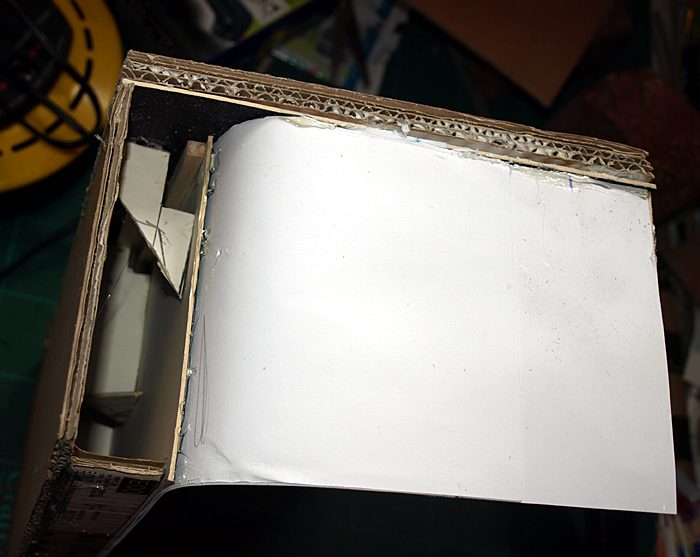
The back-scene is wider than A3 and so the montage of two genuine photos of the site of the layout was printed off in two sections. The join actually comes behind the shed and although not obvious it might have been better located in front of the shed and then disguised by a telephone pole or as water tower. A point noted/learnt for future projects. The back-scene had originally been a single ply sheet braced with some card buttresses. This had rippled. As a fix I have added another vertical sheet of corrugated card, glued to the base and the buttresses plus a longitudinal length of the cardboard along the top to make a box girder section. The base has been glued to two full area sheets of the corrugated cardboard with the corrugations set at 90 deg to each other. After drying under a brick for about 18 hours it all appears to have set solid as expected. However the pegs used to hold the paper back-scene to the card have made a mark, annoying. The experience point noted/learnt for further builds is not to use single ply photo mounting board as it will flex over time.
A sheet of the cardboard was also glued behind the back-scene to the rear of the shed. Hopefully the shed bracing will also brace that and minimise the ripple problem. There is not space in the storage box to add length so the next point to note/learn with a shoe box diorama is to allow enough slop to get the layout into the box - this one is a bit too tight.
The glues used were a mix of No More Nails and my hot glue gun. The No More Nails was to hand and needed using up; having used it here, and also on the Christmas 2008 project, the instant grab factor didn't occur and I wasn't that impressed.
There are additional photographs of several miniature railways visited as part of the prototype research for this project on my photo gallery page.
Still to do - paint the new works with two coats of matt back paint, add a water tower and possibly a diesel pump and oil spill bund. I also want to spray all the back-scene with matt varnish to avoid any running if water gets spilled. I have some stock to build for this from Alphagraphix in card plus some other ideas of my own for stock based on Lakeside, RHDR and R&ER carriages. I won't be rushing the project but it will evolve over time. I have also ideas in mind for revision of the scenery at the front of the layout to experiment with some new to me techniques.
Back to page top | To the start of the build log | To the latest update
Progress update - (4) - 21st May 2009- Some locomotive stock changes and update of the fictitious background / back story.
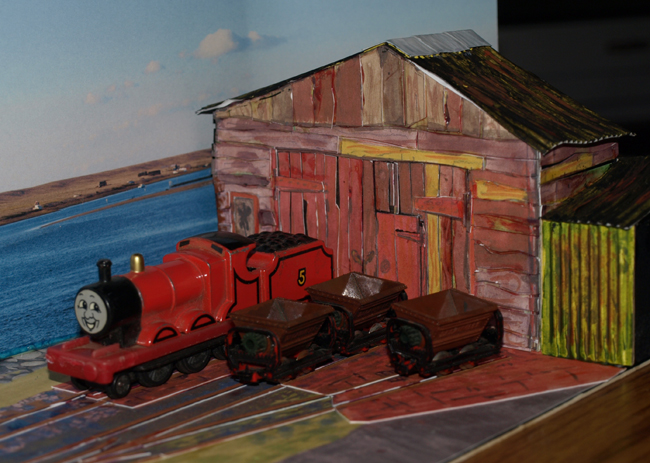
As every “real” railway has a back history Pebbles End is no exception and has a fictitious back history too. As you can see from the photo’s back in 2007 the line was fictitiously being operated by an import from Australia, a diesel locomotive built originally for the Fairymeade Cane Mill by ComEng, and named whilst in Dorset as “Octavius”. The name chosen as it would have been the next name in sequence on the Pike Brothers Tramway in Purbeck. Also on site but out of use pending a possible re-gauging was the red 2-6-0 “James”. Nothing has changed with regard to James although on the latest photo safari visit he was inside the shed. However the ComEng has been sold on as it proved too big and top heavy for the line. Current motive power for the PELR is the former locomotive from the Bere Regis SylvaSprings / Vitacress system and renamed in her new home as" Bere Regis 1".

The reality is that the ex-Vitacress loco is a based on a prototype engine that ran at Bere Regis in Dorset and a simple card printy kit based on it is available courtesy of Michael Mott and the GN Tome. (See http://tome.gn15.info and then page 8 of the January 2007 edition.) A little bit of work in Photoshop making slight modifications to the kit saw the the livery changed from SylvaSprings/Vitacress to PELR and a scaling down to 1:43. The result is the PELR gets some appropriate motive power. Why did I do this today? A spot of quick relaxation modelling and creation of this dummy run /mock up for a later proper build. The ERTL "James" seen in the earlier pictures actually has a 14mm gauge wheelbase so is, as per the fiction above, in store pending my thoughts on what if anything to use it for. Also in the line's workshop at present are a Black Dog "Mite", a pair of Avalon coaches and some bits to make a pair of workshop support wagons. The latter are actually to be coupling converter trucks with opposing coupling types at each end.
Back to page top | To the start of the build log | To the latest update
Progress update - (5) - 30th April 2011
How time flies! Roughly two years since the last update and nothing to show for it except lots of bits bought and ideas for a larger version of the project. However then the coverage of the royal wedding of Willam and Kate reached saturation point and to give myself an alternative to watching it live on TV I set out to have a go at recreating the original "layout in a day" but with working tracks this time and opening doors to the shed. The activity on the day can be read here - RM Web thread. Suffice it to say the target this time was not met but not for want of trying and I do have the basis of a layout. base this time is three layers of Corex plastic sheet recycled from event posters skimmed with photo-mouting board. Glue used was Bostik Solvent Free (Turquoise tube colour).
Below - The old and new layouts compared part way through the build phase.
So at the end of play on Wedding Day the 2nd project was under way and had reached the point shown below plus a little bit of additional painting in the built up area around the shed. The locos are unpowered; 4472 is a static front end but the tender is mobile and can be shunted as can the diesel. I need to make some mods to them for drivers seats etc.


Back to page top | To the start of the build log | To the latest update
Latest update - (6) - 17th May 2011
So at the end of play on Wedding Day the 2nd project was under way but the line was not complete. Since then a few more scenic decisions have been made and the layout has been offered to MOMING 2011 at Pewsey so it will be finished! The final scenic decison has been made, what to do with the end I left open on build 1. At that point there will be station facade so that the final scenic area will have similarities to that of the former Sutton Miniature Railway at Sutton Coldfield.
Back to page top | To the start of the build log | To the latest update
Retrospective update - (6) - To August 2011 (Retrospectively added 20th April 2017)
A recent review of my web-site content identified that for some reason any updates written and up-loaded after 11th May 2011, together with those following the layout's appearance at the 2011 MOMING Show at Pewsey, had been overwritten by the older update (6) above.
Pewsey/MOMING 2011
The above event was held on 13 August 2011 and Pebbles End had been promised as mentioned. The build had not gone according to plan after the 11th May 2011 update covered above therefore I add a brief summary of the snags/positives below. These had all been written up on the Gnatterbox forum too but sadly there appears to have been a cull on posts there and I can't find the text! The Show was written up by Mick Thornton and his report on the day and link to his photo album can be found here.
Design concept (baseboards) - In homage to the late Carl Arendt (who had died that March) a promoter of shoe-box and other micro-layout designs the idea was to have three small sub-baseboards linking together. The intended plug/socket system using three interlocking sections of brass tube can be seen below in this shot of what became the right hand end loco shed base. The idea was to provide two-solutions: the centre section would have been operable with off-stage cassettes and aid storage between layout working sessions. Sadly this idea failed, firstly the sections were too light to stay attached using the experimental Corex board as a base and also these light weight sections proved impractical to level. The decision was therefore taken to fix the three sections permanently together using a more rigid one piece base and L shaped aluminium strips to attempt to secure long-tern rigidity, albeit without adding to much weight.


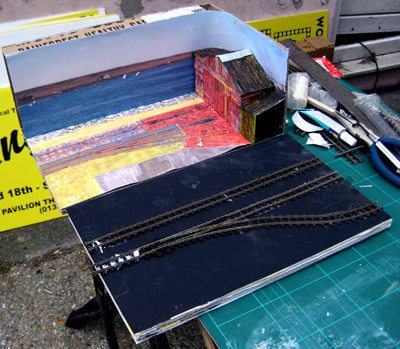
Design concept (track) - At the left-hand end a three track traverser inside the dummy station building. That to have a canopy roof (Dapol kit) inside the immediate facade at the scenic end. Power to the rails coming from the tubes on which the traverser slides on. This was tricky to build but worked OK at MOMING although some minor tweaking is still required for levelling and alignment. The final arrangement is visible below. The four brass tubes on which the traverser run allow the four electric feeds to be connected to the rails (One common and three section feeds).

Design concept (scenic) - The right hand end, as viewed by the public, to have a representation of the large shed with the distinctive angled wings from the Portland Breakwater; visible in the photo below. By looping the track through this building in a 90 degree curve towards the rear (shown above) it also adds immediate siding capacity for working interest and also permits a future option to build an extension featuring a combination of the stub pier and the longer pier visible in the images below.

As a reminder to readers who may not be aware this breakwater at Bincleaves which separates Newton's Cove from Portland Harbour was part of the complex used as a site for torpedo development/testing and had a hand-operated narrow gauge railway. As can be seen in the image below it was still in situ, but out of use, when these photos were taken in 2011. The site (2017) is currently being redeveloped for a housing scheme.

Scenery notes - The workshop building features one of the Carama 1:43 garage/workshop mouldings that comes with a Volkswagen Beetle car; it has been split to make one single sided workshop wall but double the originally supplied L shaped length. Use of photographs taken of local buildings then scaled and printed onto card to form texture sheets can also be seen below; the wooden dividing wall being such a texture obtained by photographing a building in Weymouth. Other prints, based on the original shoe box design, have also been reused. The size of panels for the station building is based on that used in the station building on Portland at the Victoria Square station. The overall station design based on that at the former Sutton Miniature Railway at Sutton Coldfield in the Midlands. In one of the other miscellaneous catalogue of woes on this job the doors and associated hinges went missing; for the hinges the how and when is a mystery as the picture above in the 30th April 2011 update shows them firmly attached! If I had removed them for some reason, perhaps a complication of adding the outer skins, the memory of doing so was lost not long afterwards!

Electrics - A separate control panel was built using traditional analogue switching and sections. However unfortunately an unexpected wiring break occurred within the plug but was successfully bodged over the MOMING weekend. The point is electrofrog. Although in home running the point seemed satisfactory it was discovered during at Pewsey that a PECO switch is required to switch the crossing (frog) polarity in addition to the feed via the blades.
Rolling stock issues - A couple of final setbacks were (1) in spraying the locomotive the undercoat/primer went on beautifully, the top coat sadly not. It will do but will need some weathering to bring it to a standard acceptable to me, whereas I had originally intended the diesel to be ex-works. As it is a resin kit no options for dumping in Nitromores and starting again! (2) Unfortunately I also had a disaster whilst handling the chassis of the Bachmann Plymouth donor; managing somehow to knock off the couplings and sending the centring spring flying across the carpet to be lost forever!
Summary as at Summer 2011.
Overall the outcome from the effort during 2011 was that despite considerable hours going into the project it was not fully complete at MOMING. The consequence was me feeling burnt-out with modelling and somewhat dispirited. Other research projects, and my media degree, subsequently intervened and until Spring 2017 no further work on the layout was planned or attempted. The photos below, and associated album of additional images, show the layout in the condition it was in when it went into storage.

Back to page top | To the start of the build log | To the latest update
Progress update - (7) - 22nd April 2017
As outlined above this project, along with Reindeer Landing, was put on hold in late 2011 as I lost my interest in modelling after the Pewsey MOMING show and then, having started a media degree and research projects into full-size railway history, I had no time available for modelling as interest again stirred. Luckily, a recent inspection has identified that despite the subsequent prolonged lay-up period in my slightly damp outside storage areas it has broadly survived undamaged with the only significant deterioration currently noticeable some rusting on an old length of steel track inside the large building. I am again feeling like continuing with this project. With it being traverser based operation will need to be from behind or use two operators. Scenically I think it needs a wider triangular/wedge shaped apron adding in front of the layout with the pier section also constructed at the rear. The rectangle thus created would have the railway section displayed as an inverted V thus avoiding the parallel to the baseboard front situation of so many layouts, including this one currently.
As a next step I want to work on getting the rolling stock finished and it is likely that baseboards for a Reindeer Landing Mk 2 may well be done first to give me something to operate/test with (I.e. play trains) on the patio over the summer whilst scenic and other work progresses here. Through lack of space the summer. outdoors is my main modelling time as is apparent in the under construction images above.
Back to page top | To the start of the build log | To the latest update